• Skip to primary navigation
  • Skip to main content
  • Skip to primary sidebar
The Jam Jar Kitchen
  • Search Recipes
    • Main Course
    • Side Dishes
    • Dessert
    • Drinks
    • Preserves and Pickles
    • Soups & Stews
    • 4th of July
  • Travel
  • Shop
  • Our Mission
  • About Me
    • Contact
  • Subscribe
    • Facebook
    • Instagram
    • Pinterest
    • RSS
    • Snapchat
    • Twitter
  • Home
  • Search Recipes
    • Breakfast & Brunch
    • Main Course
    • Side Dishes
    • Dessert
    • Drinks
  • Travel
  • Shop
  • Events
  • About
    • About Me
    • Our Mission
    • Contact
    • Privacy Policy and Disclaimer
  • Subscribe
menu icon
go to homepage
search icon
Homepage link
  • Search Recipes
    • Main Course
    • Side Dishes
    • Dessert
    • Drinks
    • Preserves and Pickles
    • Soups & Stews
    • 4th of July
  • Travel
  • Shop
  • Our Mission
  • About Me
    • Contact
  • Subscribe
    • Email
    • Facebook
    • Instagram
    • Pinterest
  • ×
    Home » Pasta » Baked Mac and Cheese

    Baked Mac and Cheese

    Published: Jun 23, 2021 · Modified: Mar 9, 2026 by jamjarkitchen · This post may contain affiliate links · 14 Comments

    Jump to Recipe

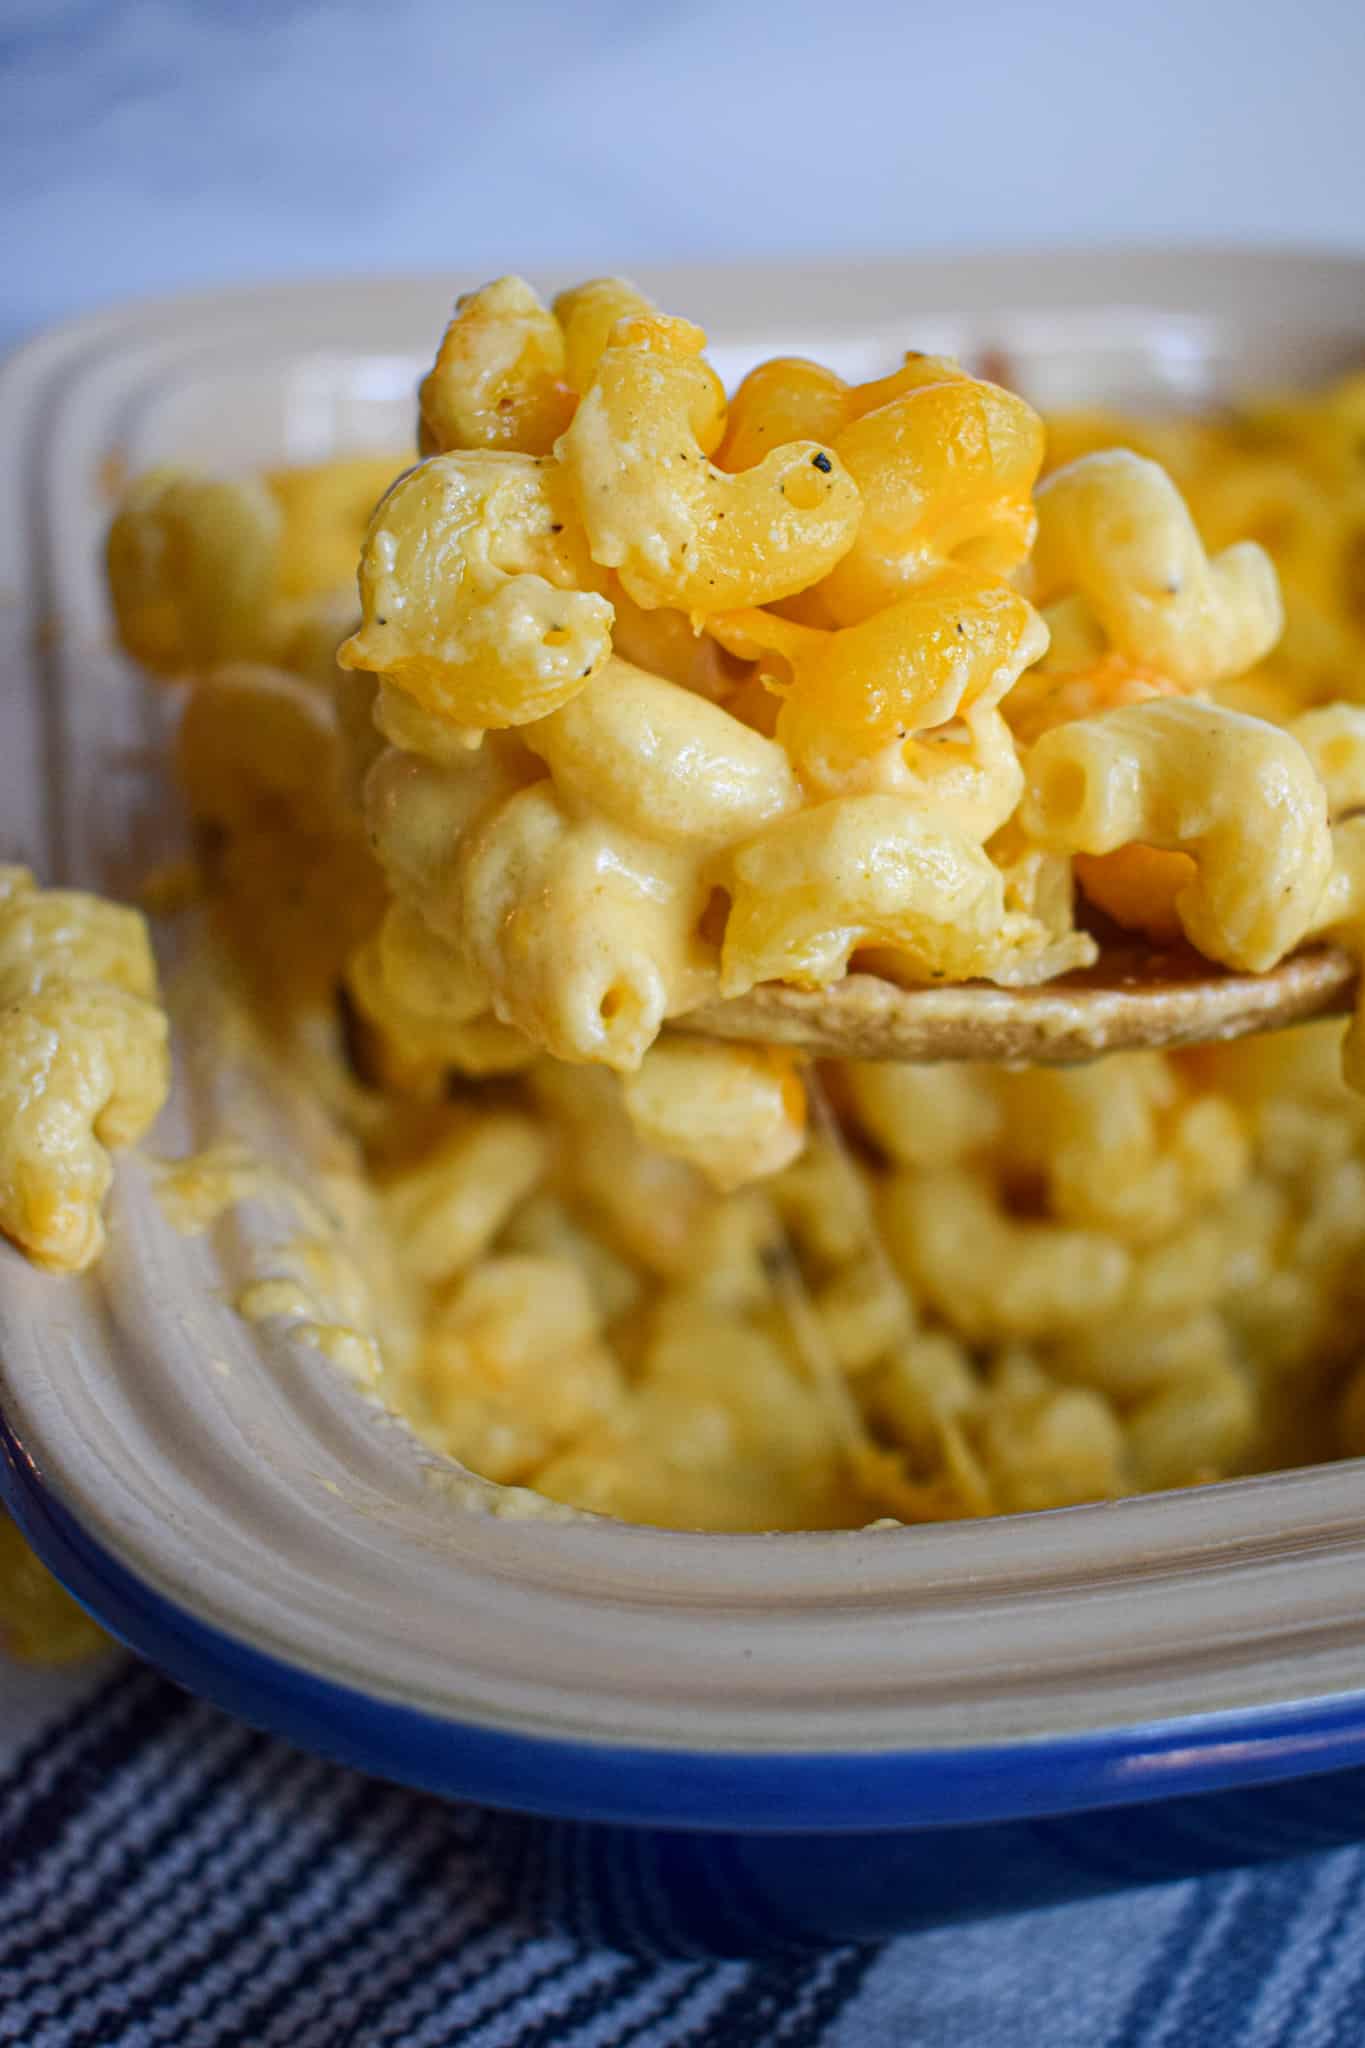
    This baked mac and cheese is the ultimate comfort food upgrade. Cavatappi pasta, sharp cheddar, and gruyere come together in a dish so rich, creamy, and satisfying that it's guaranteed to earn a permanent spot in your family dinner rotation. Simple enough for a weeknight but impressive enough for a crowd, this is the kind of recipe that has everyone going back for seconds.

    A close-up of creamy Baked Mac and Cheese being scooped out of a casserole dish with a wooden spoon, showcasing its gooey perfection.

    Let's be honest, macaroni and cheese might just be the most universally loved comfort food on the planet, and this baked version is here to remind you exactly why.

    While this recipe technically stars cavatappi pasta (so maybe it should be called cavatappi and cheese!), I think we all know what we're really talking about here. This is baked mac and cheese at its simplest and its absolute finest. And while you absolutely can customize this recipe with different toppings and add-ins, there is something deeply, soul-warmingly perfect about keeping it classic.

    Whether you're making this for a weeknight family dinner, a holiday side dish, or simply because you deserve something truly delicious, this recipe delivers pure, unapologetic comfort in every single cheesy bite. And I have a feeling it's about to become a permanent fixture in your kitchen.

    Jump to:
    • Why use cavatappi pasta?
    • More Side Dish Recipes for you to enjoy.
    • Equipment
    • Ingredients
    • Step by Step Instructions
    • Frequently Asked Questions
    • Recipe

    Why use cavatappi pasta?

    Guys, I have to tell y'all something. Over the years and many different mac and cheeses later I have found that I am not actually sold on the macaroni past shape. Particularly when baked! For me it's simply too easy for macaroni pasta to get soggy so my solution.... Cavatappi!

    Cavatappi is a bit larger and thicker and thus is remains firm even after soaking up all that ooey gooey cheesy sauce. Perfectly al dente pasta in mac and cheese? Yes please!

    More Side Dish Recipes for you to enjoy.

    • A delicious bowl of broccoli bacon salad with dried cranberries, sunflower seeds, and a creamy dressing, served with a spoon.
      Broccoli Bacon Salad
    • A bowl of creamy shrimp salad with herbs, garnished with fresh dill, surrounded by rectangular crackers on a white surface.
      Shrimp Salad
    • A plate of citrus and fennel salad with burrata, topped with chopped pistachios and fresh herbs, features sliced oranges and a creamy ball of burrata cheese, with a fork resting on the side.
      Citrus and Fennel Salad with Burrata
    • A baking dish filled with baked cinnamon apples and topped with four scoops of vanilla ice cream; apples, plates, and forks are nearby.
      Baked Cinnamon Apples
    A wooden spoon rests in a baking dish filled with creamy, Baked Mac and Cheese with cavatappi pasta.

    Equipment

    • Dutch oven or other pot for making the cheese sauce: I love my Le Creuset Dutch Oven and use it more than any other kitchen item.
    • Large pot for boiling pasta (optional): When I feel like doing less dishes I just pre boil the pasta in the dutch oven, then drain and make the cheese sauce.
    • Colandar: For draining the pasta.
    • Cheese grater: I love this Oxo Box Grater. Highly recommend grating your cheese fresh for this recipe.
    • Whisk
    • 9x12 inch casserole dish (or dish of a comparable size): I love this Le Creuset 4 qt casserole dish with lid.

    Ingredients

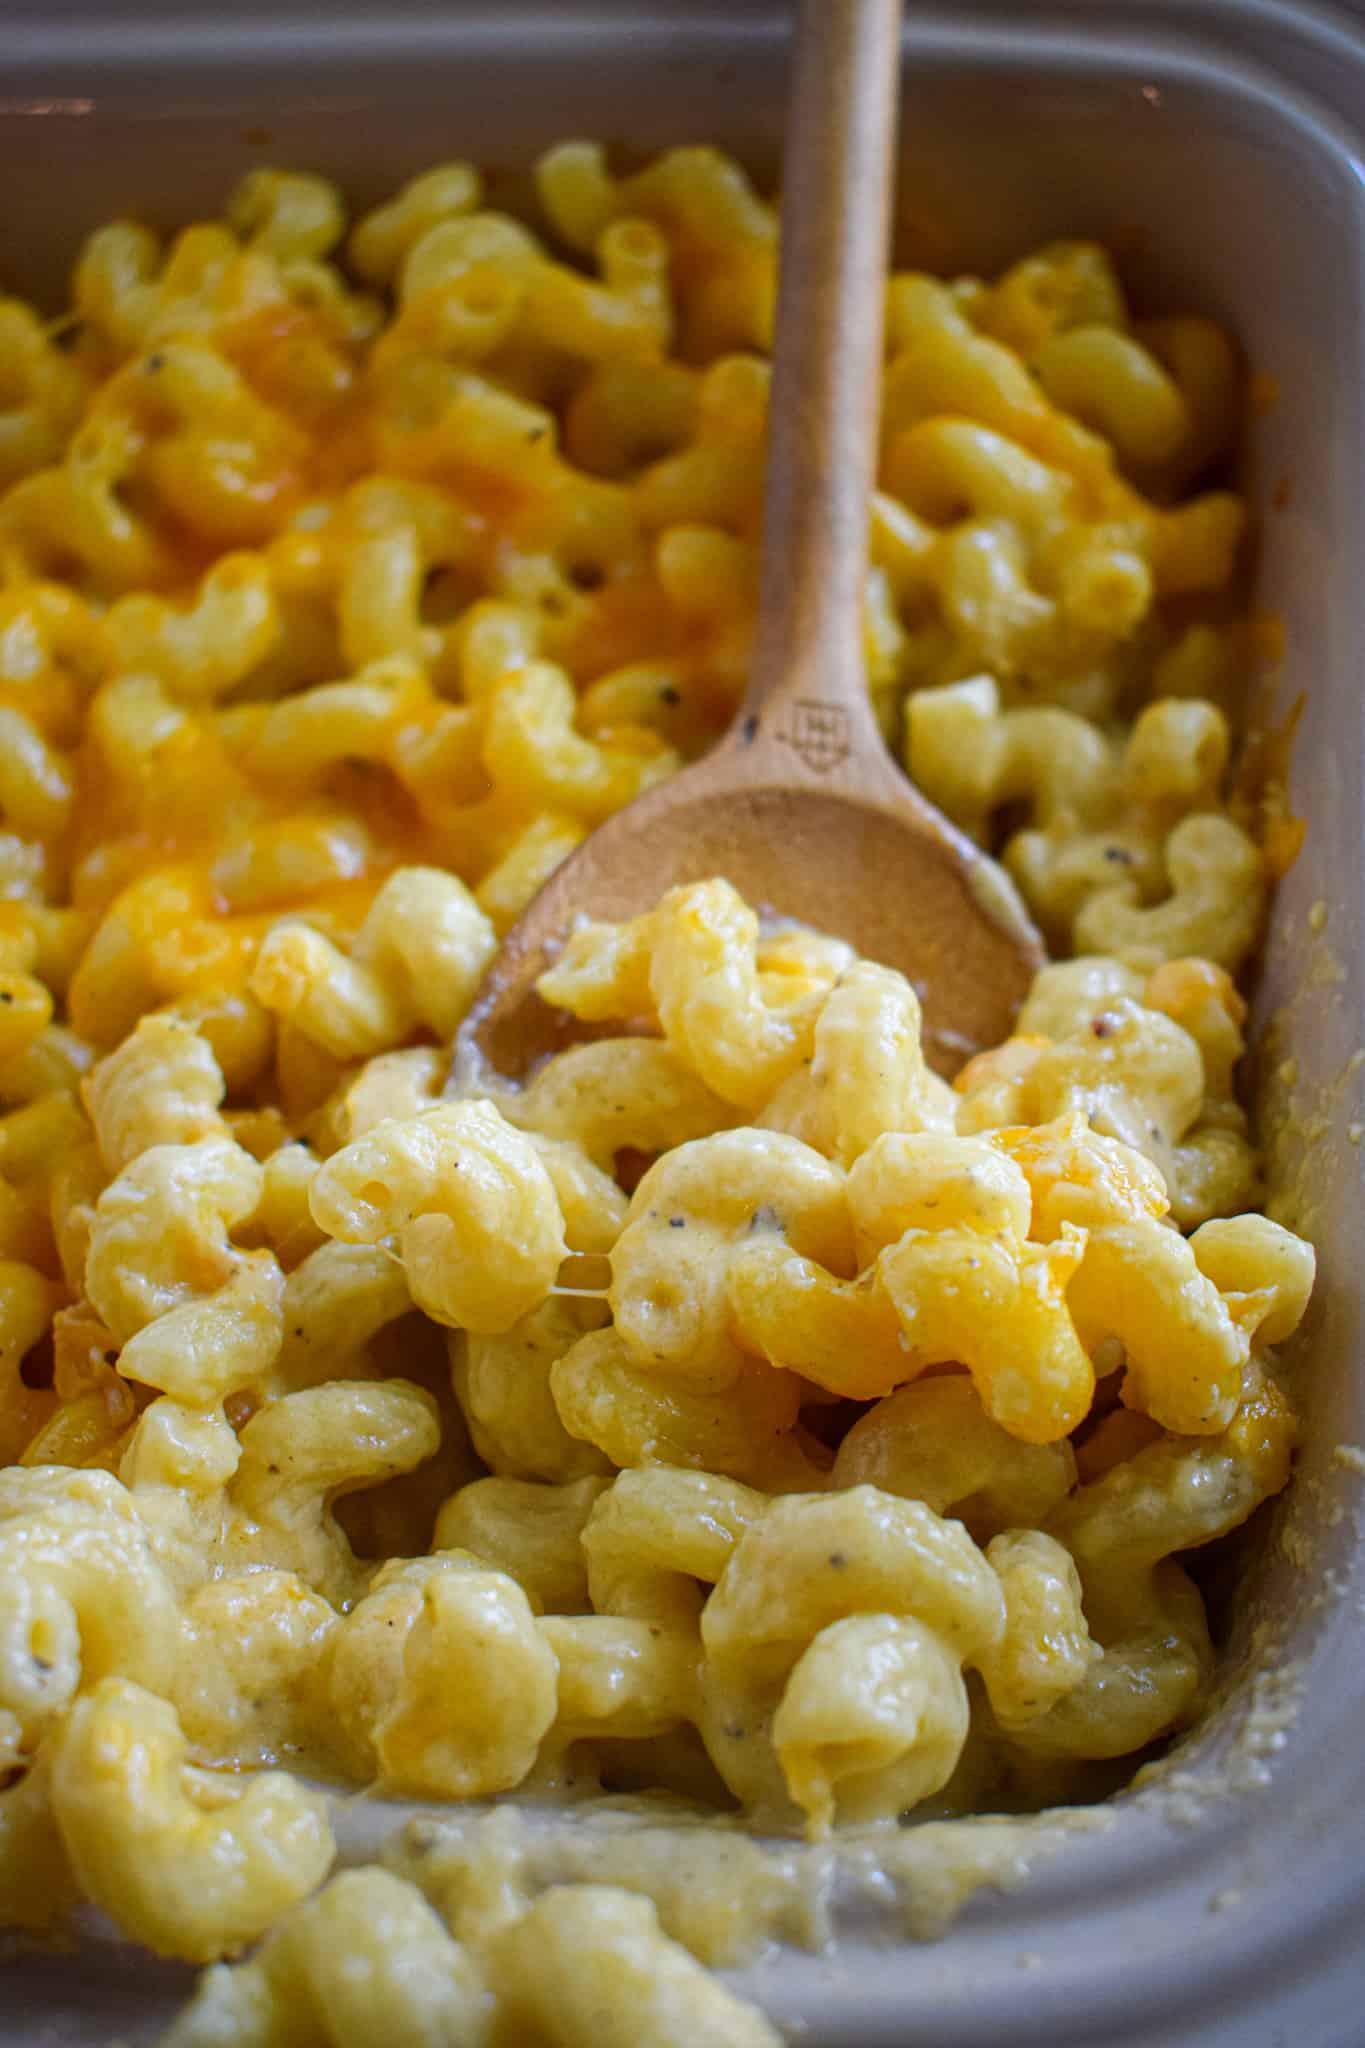
    • Sharp cheddar and Gruyere cheese: I love using a mix of sharp cheddar and gruyere for mac and cheese. I typically do abot 8 oz sharp cheddar to 5 oz gruyere, simply because those are the most common cheese block sizes. I HIGHLY recommend grating your own cheese. Pre-shredded cheeses have different powders on them to prevent them from clumping or melting in the bag. Because of this they do not melt well in a cheese sauce.
    • Cavatappi pasta: As mentioned I just love cavatappi pasta in "mac" and cheese. It holds up so much better than macaroni. Be sure to cook very al dente.
    • Butter: I'm a huge fan of Kerry Gold butter.
    • Flour
    • Milk: I recommend using whole milk.
    • Salt & pepper
    • Pinch of cayenne (optional)
    • Pinch of nutmeg (optional)

    Step by Step Instructions

    Time needed: 45 minutes

    How to make baked macaroni and cheese.

    1. Preheat the oven to 375 degrees F. Cook and drain the pasta.

      Make sure you cook it a little firmer than al dente, usually a minute or two less than the instructions. It will continue to soften when it bakes.

    2. While the pasta is cooking, grate the cheese.

      You need about 2 cups of freshly grated cheese.
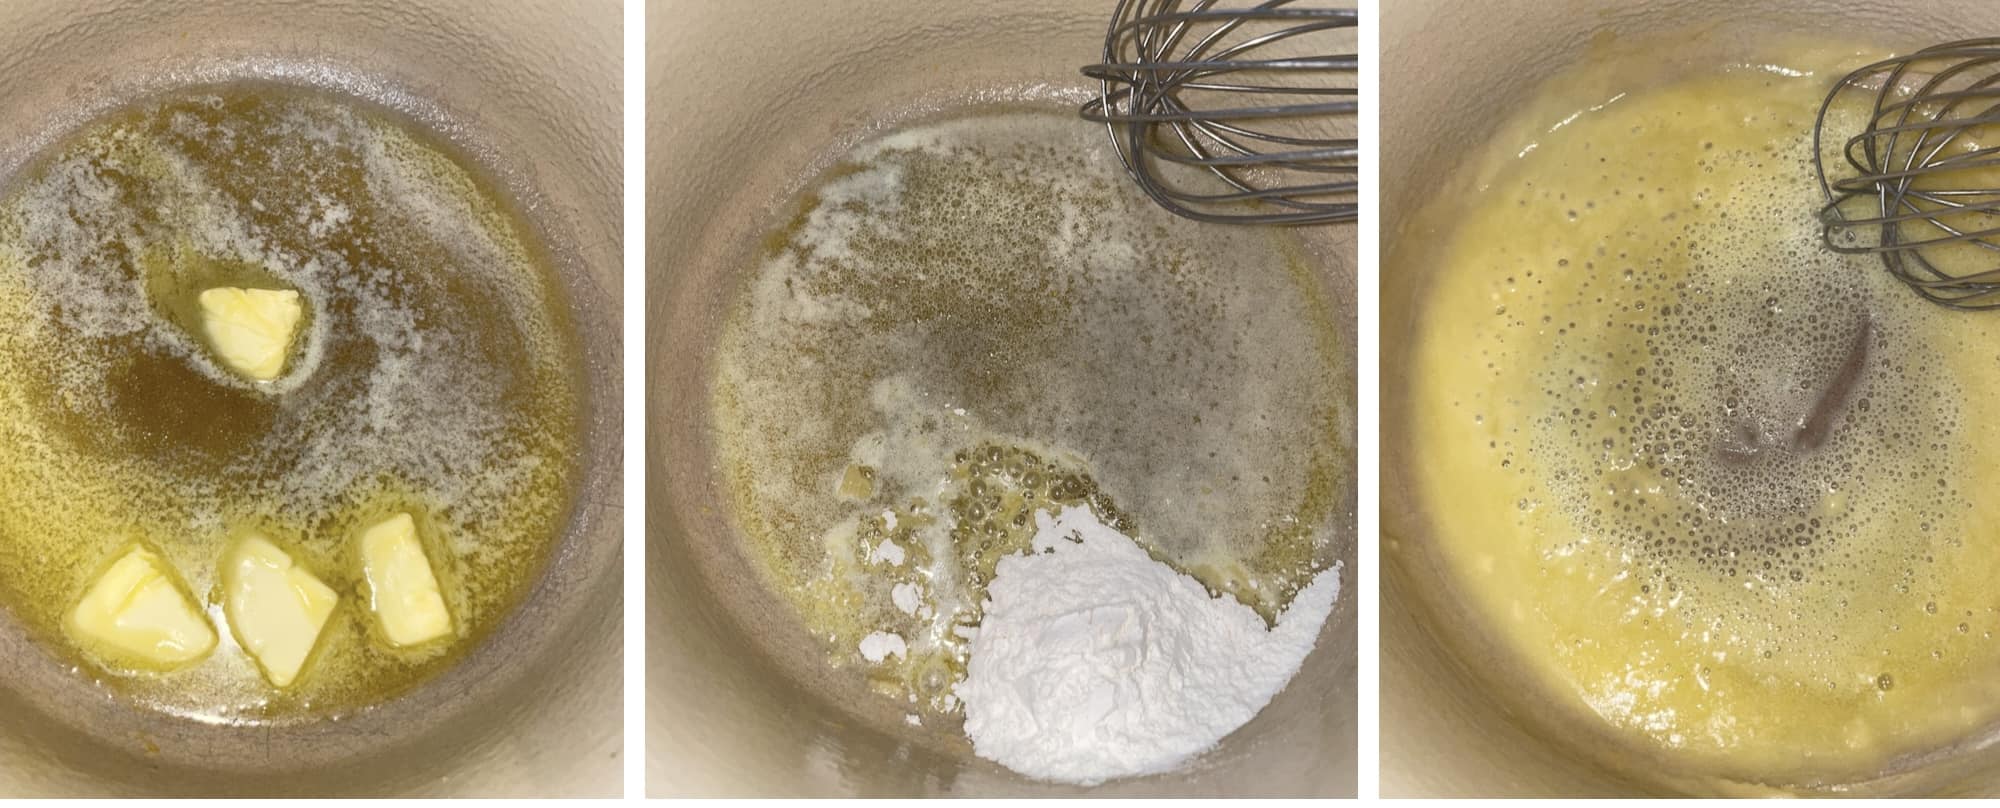
    3. Make the roux.

      Don't skip the step of cooking the flour and butter for at least a minute before moving on and adding the milk.

      Three-step process for Baked Mac and Cheese: melt butter in a pan, add flour, and whisk the mixture to form a smooth roux.

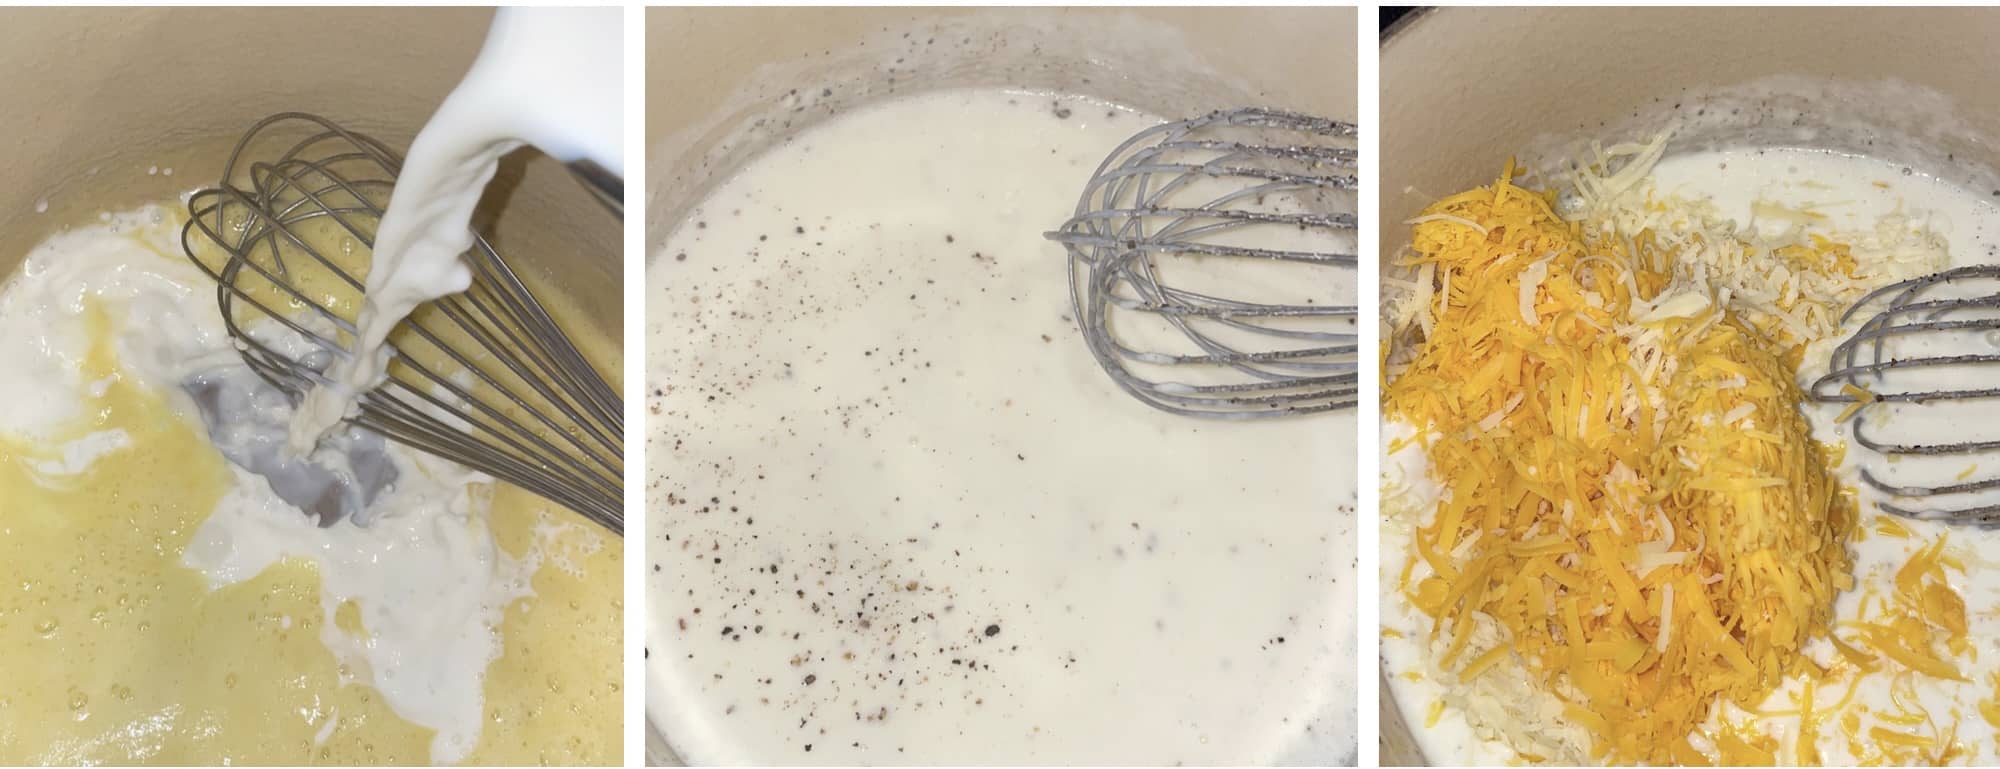
    4. Make the cheese sauce.

      Wait to add the cheese until the sauce has thickened.

      Three-step process for Baked Mac and Cheese: pouring milk into a roux, whisking milk with pepper, and adding shredded cheese to the mixture.

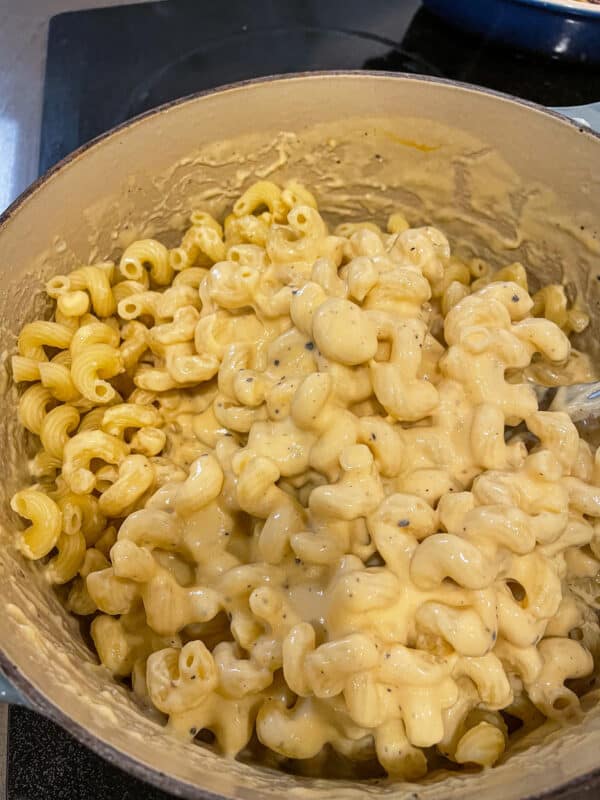
    5. Add cooked pasta and mix to combine.


      A pot filled with cooked cavatappi pasta, half coated with a creamy cheese sauce reminiscent of classic Baked Mac and Cheese and half plain, sits on a stovetop.

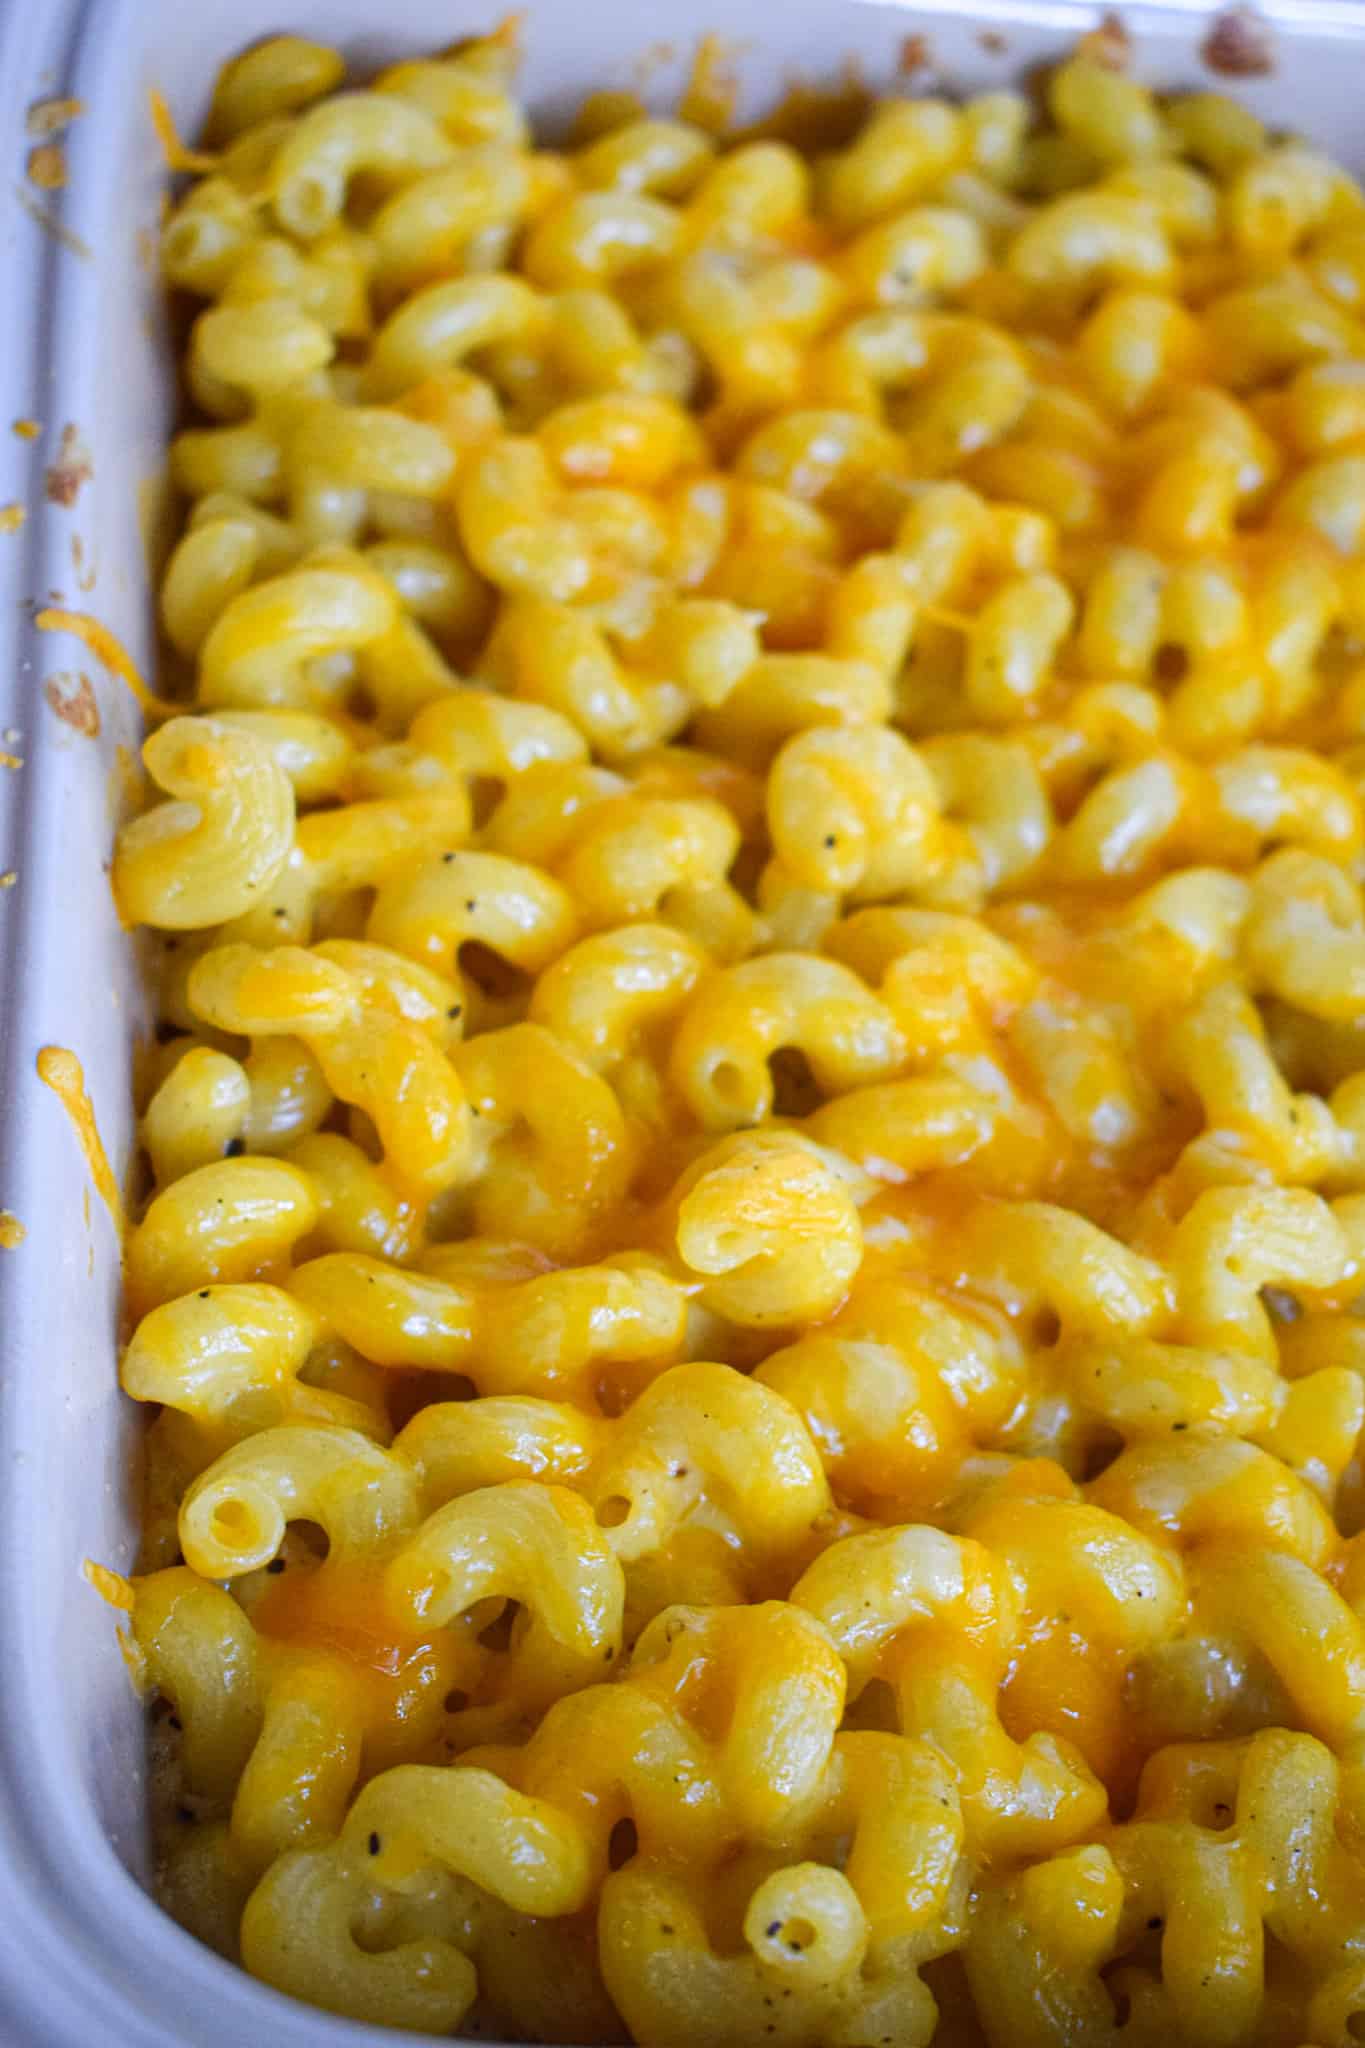
    6. Pour ½ of the pasta into the casserole dish and sprinkle with ⅓rd cup cheese.

    7. Add the remaining pasta to the dish and sprinkle with the rest of the shredded cheese.

    8. Bake at 375 for 15-17 minutes until bubbly.

    9. Rest for 5 minutes and enjoy!

    Baked Mac and Cheese in a white dish, featuring elbow pasta coated in rich, melted cheddar cheese.

    Frequently Asked Questions

    Can I use pre-shredded cheese?

    I would NOT recommend it. Store bought shredded cheeses are treated so that they don't clump or melt in the bag which prevents them from melting correctly in a cheese sauce.

    I know it seems like a pain to grate your own cheese but it really is worth the deliciousness!

    Can I use different kinds of cheese?

    You can! I love a combo of sharp cheddar and gruyere. If you'd prefer to just use cheddar or add in Monterey jack feel free. Just make sure the cheese melts well.

    Can I add toppings?

    You can! I kind of love the classic straight melted cheese on top. But for a crisp topping you can mix Panko with a little melted butter and add that before baking.

    Can I make this baked mac and cheese in adavance?

    You can! Simply follow the recipe up until baking then cover with foil and store in the fridge for up to 3 days. Then bake according to instructions, adding another 5-10 minutes.

    How should I store baked mac and cheese?

    You can store this mac and cheese covered tightly in the fridge for around 3-4 days.

    More mac and cheese varieties to check out.

    Creamy Stovetop Broccoli Mac & Cheese

    Hatch Green Chile Mac & Cheese

    Enjoyed this homemade baked macaroni and cheese recipe? Let me know what you think in the comments!

    Recipe

    A close-up of a spoonful of creamy Baked Mac and Cheese, showing melted cheddar cheese and perfectly cooked elbow pasta.

    Baked Mac and Cheese

    This simple but so delicious recipe for baked mac and cheese is sure to become a family favorite! Trading traditional macaroni for cavatappi pasta, this recipe combines sharp cheddar and gruyere cheese for an al dente bite full of luscious cheesy goodness.
    4.87 from 51 votes
    Print Recipe SaveSaved! Pin Recipe
    Prep Time 5 minutes mins
    Cook Time 40 minutes mins
    Total Time 45 minutes mins
    Course Main Course, Side Dish
    Cuisine American
    Servings 8 servings
    Calories 463 kcal

    Equipment

    • Large pot
    • Cheese grater
    • 9x12 casserole dish
    • whisk
    • colander

    Ingredients
      

    • 1 lb Cavatappi pasta
    • 8 oz sharp cheddar cheese, freshly shredded
    • 5 oz gruyere cheese, freshly shredded
    • 3 tablespoon butter
    • 3 tablespoon flour
    • 3 cups milk I recommend whole milk
    • 1 teaspoon salt
    • 1 teaspoon black pepper
    • pinch of cayenne optional
    • pinch of ground nutmeg optional

    Instructions
     

    • Preheat oven to 375 degrees F.
      Bring a large pot of salted water to a boil and cook the pasta about 1-2 minutes less than package instructions. Very al dente.
      Drain the pasta in a colander and set aside.
    • While the pasta is cooking, grate the cheese. Mix the cheddar and gruyere, then divide out approximately 2 cups for the sauce and 1 cup for the topping. Set aside.
    • Make the roux by melting 3 tablespoon of butter over medium high heat in a dutch oven or other pot.
      Add 3 tablespoon of flour and cook over medium high heat for 1-2 minutes, whisking constantly.
      While continuing to whisk, stream in 3 cups of whole milk. Whisk until smooth and there are no more lumps.
      Bring the sauce to a low boil over medium high heat while whisking frequently so the it does not scorch. This will take about 5 minutes.
      Once a boil has been reached turn the heat down to low and cook for an additional 2-3 minutes until thickened.
      Remove from the heat and add salt, pepper and a pinch of cayenne and nutmeg. Stir to combine.
      Add two cups of grated cheese and stir until the cheese has melted and is fully incorporated.
      Add the pasta to the cheese sauce and stir until it is evenly coated.
    • Pour ½ of the pasta and cheese sauce into the bottom of the casserole dish.
      Sprinkle about ⅓rd cup of cheese evenly on the top.
      Add the remaining pasta and cheese sauce and top with the remaining cheese.
    • Bake the mac and cheese uncovered at 375 degrees F for about 15-17 minutes until the cheese is bubbly and cooked.
      Remove from the oven and allow to rest at least 5 minutes before serving.
      Enjoy!

    Nutrition

    Calories: 463kcalCarbohydrates: 48.5gProtein: 21.3gFat: 21gSaturated Fat: 12.4gPolyunsaturated Fat: 0.5gMonounsaturated Fat: 3gCholesterol: 60.9mgSodium: 597.9mgPotassium: 49.5mgFiber: 2.1gSugar: 2.1g
    Keyword cavatappi pasta, cheddar cheese, Easy, gruyere cheese, homemade, mac and cheese, Simple
    Tried this recipe?Let us know how it was!

    More Pasta

    • A white bowl filled with Tortellini Pasta Salad featuring sliced salami, cherry tomatoes, red onion, cucumber, and herbs, placed on a wooden board.
      Tortellini Pasta Salad
    • A bowl of couscous salad with chopped cucumber, red onion, tomato, carrot, and fresh herbs sits ready to enjoy, with a lemon half and parsley in the background. This vibrant couscous salad is perfect for a refreshing meal.
      Couscous Salad
    • Overhead view of a plate of slow cooker chicken spaghetti served with melted cheese and garnished with parsley. The creamy, cheesy pasta sits on a stack of white plates next to the slow cooker, with a fork resting on the plate and a textured dish towel in the background.
      Slow Cooker Chicken Spaghetti
    • Large pan of the best stovetop creamy macaroni and cheese with cavatappi pasta and broccoli.
      Stovetop Broccoli Mac and Cheese
    Add us as a trusted site on Google

    Reader Interactions

    Comments

    1. Kay

      August 11, 2021 at 4:29 pm

      5 stars
      This is my daughters favourite dinner she asks for it every night!! She says this recipe is the best she has tried, including from restaurants!

      Reply
    2. Jamie

      August 11, 2021 at 5:29 pm

      5 stars
      This was a wonderful addition to our family dinner and it was so satisfying too! You can't go wrong with cheesy goodness like this!

      Reply
    3. Tyanne

      August 11, 2021 at 6:57 pm

      5 stars
      Such a delicious mac and cheese! I love the cheeses used here.

      Reply
    4. Ramona

      August 12, 2021 at 2:09 am

      5 stars
      I agree with the pasta type choice totally. I really love the cheese types and combo you’ve used. Recipe saved!

      Reply
    5. Amy

      August 12, 2021 at 5:48 pm

      5 stars
      My daughter absolutely loves mac and cheese but for some reason I don't make it very often so was looking for a good recipe. Interesting about using Cavatappi. I tried it and you're right! Less soggy!! Love learning new things. Don't think I'll eve look back now!

      Reply
    6. Dana

      January 01, 2023 at 9:15 am

      Should the milk be warmed?
      Thanks!

      Reply
      • jamjarkitchen

        January 02, 2023 at 8:53 am

        No it doesn’t need to be warmed. Enjoy!

        Reply
    7. Megan

      November 22, 2023 at 10:01 am

      Does this recipe fare well if you make a day in advance?

      Reply
      • jamjarkitchen

        November 24, 2023 at 9:56 pm

        Yes, but I would hold off baking until just before. So go ahead and assemble the mac and cheese, cover with foil and refrigerate and then bake for about 10 minutes longer than the recipe states. It should come out great. Hope you enjoy!

        Reply
    8. Frank

      May 27, 2024 at 1:37 pm

      I assume you bake uncovered? Recipe didn't say. Some of us are novices 🙂

      Reply
      • jamjarkitchen

        May 29, 2024 at 12:58 pm

        Hi Frank- Yes, bake uncovered. 🙂

        Reply
    9. Lu

      September 11, 2024 at 3:24 pm

      For the cheese measurements is it 8 oz as in a cup or is it 8 oz net weight like what's written on packaging?

      Reply
      • jamjarkitchen

        September 11, 2024 at 4:33 pm

        Hi Lu- The 8 oz is by weight. This equals about 2 cups of cheese after grating. Hope this helps!

        Reply
    4.87 from 51 votes (46 ratings without comment)

    Leave a Reply Cancel reply

    Your email address will not be published. Required fields are marked *

    Recipe Rating


    Primary Sidebar

    • Facebook
    • Instagram
    • Pinterest
    Elizabeth Jordan-Flight of Jam Jar Kitchen smiling in her home kitchen while preparing a rhubarb dessert, wearing a cozy cream sweater and striped apron surrounded by baking ingredients.

    Hi, I'm Elizabeth!

    I’m a self-taught home cook, preserving enthusiast, and mama of two sharing approachable, flavor-packed recipes made with love. I believe food should be joyful, a little messy, and always worth gathering around.
    Welcome to my Jam Jar Kitchen. I’m so glad you’re here!

    • A jar of homemade salsa for canning sits on a table with fresh tomatoes, cilantro, a jalapeño, tortilla chips, and other jars of salsa in the background.
      Salsa {for Canning}
    • A glass dessert cup filled with rich cookies and cream ice cream, topped and surrounded by crunchy chocolate sandwich cookies.
      Cookies and Cream Ice Cream
    • A steaming bowl of borscht with shredded beets, a dollop of sour cream, and a sprig of dill, as a spoon lifts a portion of the vibrant soup from the bowl.
      Borscht
    • A ramekin of classic Crème Brûlée topped with blackberries, raspberries, and mint sits on a plate, with a spoonful of silky custard resting beside it.
      Crème Brûlée

    Our Mission:

    A percentage of all proceeds made by The Jam Jar Kitchen blog are donated to Preserve International to fund empowerment programs for women small-scale farmers in northern Uganda. Join our mission to fight hunger and seasonal poverty through innovative post harvest and food preservation technology and training!

    A group of South Sudanese refugee women trained by Preserve International stand smiling in aprons and headscarves next to a bright green Sparky Dryer, celebrating their success in food preservation and small-scale agribusiness.

    Never miss a recipe!

    Sign up to The Jam Jar Kitchen Newsletter to receive new free recipes every month!

    • A plate of Grilled Bell Peppers, featuring roasted red and yellow peppers with beautifully blackened grill marks on their skins.
      Easy Grilled Bell Peppers
    • A glass jar of Vanilla Bean Panna Cotta topped with pomegranate seeds and a mint sprig, with scattered pomegranate seeds on the white surface nearby.
      Vanilla Bean Panna Cotta
    • A bowl of fresh Pico de Gallo made with diced tomatoes, onions, cilantro, and jalapeños, surrounded by tortilla chips and garnished with cilantro.
      Fresh Pico de Gallo
    Elizabeth Jordan-Flight of Jam Jar Kitchen smiling in her home kitchen while preparing a rhubarb dessert, wearing a cozy cream sweater and striped apron surrounded by baking ingredients.

    Hi, I'm Elizabeth!

    I’m a self-taught home cook, preserving enthusiast, and mama of two sharing approachable, flavor-packed recipes made with love. I believe food should be joyful, a little messy, and always worth gathering around.
    Welcome to my Jam Jar Kitchen. I’m so glad you’re here!

    • A slice of bread with carrot cake jam sits on a white plate next to a jar of jam and a spoon, with fresh carrots and more jam jars in the background.
      Carrot Cake Jam
    • A close-up of a spoon holding several garlic cloves in a bowl of oil, with more garlic cloves visible submerged in the oil, showcasing the rich texture of homemade garlic confit.
      Garlic Confit
    • A slice of Shepherd's pie with ground meat, vegetables, and mashed potato topping is served on a plate with a fork; the rest of this classic Shepherd's pie sits in a baking pan in the background.
      Shepherd's Pie
    • A loaf of sliced Irish soda bread rests on a wooden board, with a dish of butter and a sprig of herbs in the background.
      Traditional Irish Soda Bread

    Our Mission:

    A percentage of all proceeds made by The Jam Jar Kitchen blog are donated to Preserve International to fund empowerment programs for women small-scale farmers in northern Uganda. Join our mission to fight hunger and seasonal poverty through innovative post harvest and food preservation technology and training!

    A group of South Sudanese refugee women trained by Preserve International stand smiling in aprons and headscarves next to a bright green Sparky Dryer, celebrating their success in food preservation and small-scale agribusiness.

    Never miss a recipe!

    Sign up to The Jam Jar Kitchen Newsletter to receive new free recipes every month!

    • A flavorful Grilled Portobello mushroom Burger featuring a juicy portobello cap, roasted red pepper, red onion slices, and fresh leafy greens on a toasted bun.
      Grilled Portobello Mushroom Burgers
    • Three Strawberry & Lime White Chocolate Blondies, studded with white chocolate chunks and pieces of dried fruit, are stacked on parchment paper, with a lime wedge and scattered dried fruit pieces nearby.
      Strawberry & Lime White Chocolate Blondies
    • greek cucumber salad with tomatoes dill and olives
      Greek Cucumber Salad

    Footer

    About

    • Privacy Policy

    Sign up for the Newsletter

    Contact

    • Contact

    As an Amazon Associate I earn from qualifying purchases.

    Copyright © 2020 Brunch Pro on the Brunch Pro Theme

    Rate This Recipe

    Your vote:


    A rating is required
    A name is required
    An email is required

    Recipe Ratings without Comment

    Something went wrong. Please try again.